この記事は下記の続きになります。
CakePHP4でブログサイト作るチュートリアル
CakePHP4のアソシエーション:一対多(hasMany)
ユーザーと投稿の関係は、一人のユーザーが複数の投稿を持ち、一つの投稿が一人のユーザーに属しているという一対多の関係でした。
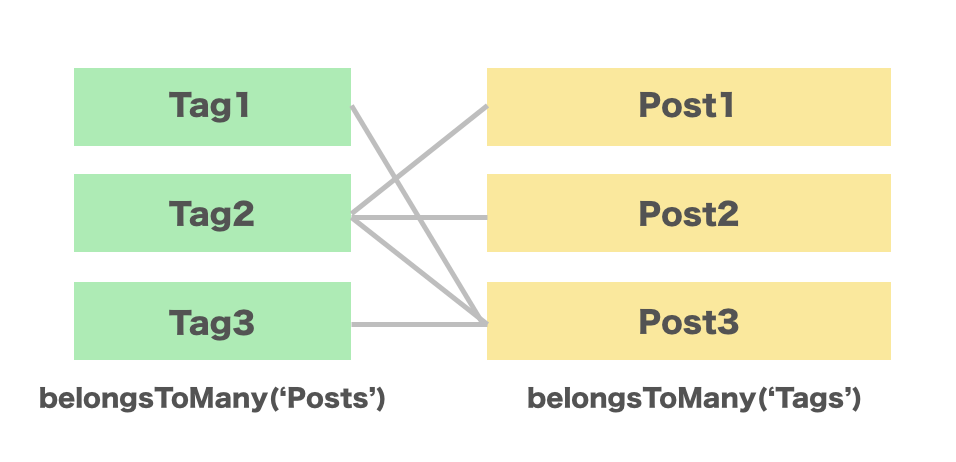
今回は一つのタグが複数の投稿を持ち、一つの投稿が複数のタグに属しているという多対多の関係でモデルを連結します。
データベース
データベースから編集しましょう。新しくタグを登録するためのテーブルを作成する必要があります。
その他にも多対多で繋ぐには中間テーブルが必要になります。
bakeでマイグレーションファイルを作成しましょう。
$ bin/cake bake migration CreateTags
生成したマイグレーションファイルを編集します。
config/Migrations/xxxxxxx_CreatePosts.php
public function change()
{
	$table = $this->table('tags');
	$table->addColumn('title', 'string', [
		'limit' => 100,
		'null' => false,
	])
	->addColumn('created', 'datetime')
	->addColumn('modified', 'datetime')
	->create();

	$table = $this->table('posts_tags');
	$table->addColumn('post_id', 'integer', [
		'null' => false
	])
	->addColumn('tag_id', 'integer', [
		'null' => false
	])
	->create();
}
マイグレーションを実行します。
$ bin/cake migrations migrate
初期データの登録
シードファイルを作って初期データも登録しておきましょう。
$ bin/cake bake seed --data Tags
生成されたシードファイルを次のように編集します。
config/Seeds/TagsSeed.php
public function run()
{
	$data = [
		[
			'title' => 'タグ1',
			'created' => '2019-12-02 10:00:00',
			'modified' => '2019-12-02 10:00:00'
		],[
			'title' => 'タグ2',
			'created' => '2019-12-03 10:00:00',
			'modified' => '2019-12-03 10:00:00'
		],[
			'title' => 'タグ3',
			'created' => '2019-12-04 10:00:00',
			'modified' => '2019-12-04 10:00:00'
		]
	];

	$table = $this->table('tags');
	$table->insert($data)->save();

	$data = [
		[
			'post_id' => 1,
			'tag_id' => 1
		],[
			'post_id' => 1,
			'tag_id' => 2
		],[
			'post_id' => 2,
			'tag_id' => 3
		],[
			'post_id' => 3,
			'tag_id' => 1
		]
	];

	$table = $this->table('posts_tags');
	$table->insert($data)->save();
}
次のコマンドでデータを登録します。
$ bin/cake migrations seed --seed TagsSeed
Model
タグ用のモデルを新しく作ります。中間テーブル用のモデルは必要ありません。
$ bin/cake bake model tags
ここまでと同じようにテーブルが設定されていたら、生成されたTagモデルは特に設定の変更は必要ないはずです。
すでに作成してあるPostモデル側にだけ設定を追記しましょう。
accessibleに追加してタグを更新できるようにします。
src/Model/Entity/Post.php
protected $_accessible = [
	'title' => true,
	'description' => true,
	'body' => true,
	'published' => true,
	'created' => true,
	'modified' => true,
	'user_id' => true,
	'tags' => true // 追加
];
リレーションの設定はテーブルで行います。
一対多の場合は一つに所属しているのでbelongsToを指定しましたが、今回は複数に所属するのでbelongsToManyを指定します。
src/Model/Table/PostsTable.php
public function initialize(array $config): void
{
	// ...

	$this->belongsToMany('Tags', [
		'foreignKey' => 'post_id',
		'targetForeignKey' => 'tag_id',
		'joinTable' => 'posts_tags',
	]);
}
フロント側コントローラー&ビュー
タグのコントローラー&ビューを作成します。
コントローラー
フロント側のコントローラーから作っていきます。
indexはタグの一覧を表示して、viewはタグに所属している投稿一覧を表示します。
src/Controller/TagsController.php
namespace App\Controller;

use Cake\ORM\Query;

class TagsController extends AppController
{
	public function initialize(): void
	{
		parent::initialize();
		$this->loadModel('Posts');
	}

	public function index()
	{
		$this->paginate = [
			'limit' => 30,
			'order' => [
				'Tags.created' => 'desc'
			]
		];
		$tags = $this->paginate($this->Tags->find());

		$this->set(compact('tags'));
	}

	public function view($id = null)
	{
		$tag = $this->Tags->get($id, [
			'contain' => ['Posts'],
		]);

		$this->paginate = [
			'limit' => 10,
			'contain' => ['Users', 'Tags'],
			'order' => [
				'Posts.created' => 'desc'
			]
		];

		$posts = $this->Posts->find()
			->matching(
				'Tags', function (Query $q) use ($id){
					return $q->where(['Tags.id' => $id]);
				}
			);
		$posts = $this->paginate($posts);

		$this->set(compact('tag', 'posts'));
	}
}
viewでタグに所属している投稿を取りたいときは$tags->postsみたいな感じでとれるのですが、おそらくこれだとページネーションできないので別に取得しています。
belongsToManyで関連先のモデルで検索する場合はmatchingを使います。
ビュー
タグの詳細ビューです。
タグはタイトルだけ表示して、あとは投稿一覧を表示してます。
templates/Tags/view.php
<div class="posts view content">
<h2>「<?= h($tag->title) ?>」の投稿一覧</h2>
<?php foreach ($posts as $post): ?>
	<p>投稿日:<time><?= h($post->created->i18nFormat('YYYY/MM/dd HH:mm:ss')) ?></time></p>
	<h3 style="margin-bottom:0"><?= h($post->title) ?></h3>
	<?= $this->Text->autoParagraph(h($post->description)); ?>
	<p><small>
		<?php if(!empty($post->tags)): ?>
		<?php foreach($post->tags as $tag): ?>
			<?= $this->Html->link($tag->title,
				['action' => 'view', $tag->id]);
			?>
			<?= $tag !== end($post->tags) ? ',' : '' ?>
		<?php endforeach; ?> /
		<?php endif; ?>
		投稿者: <?= h($post->user->username) ?>
	</small></p>
	<br>
	<?=
		$this->Html->link('記事を読む',
		['controller' => 'Posts', 'action' => 'view', $post->id],
		['class' => 'button'])
	?>
	<hr>
<?php endforeach; ?>
<?php if($this->Paginator->total() > 1): ?>
<div class="paginator">
	<ul class="pagination">
		<?= $this->Paginator->first('<< 最初') ?>
		<?= $this->Paginator->prev('< 前へ') ?>
		<?= $this->Paginator->numbers() ?>
		<?= $this->Paginator->next('次へ >') ?>
		<?= $this->Paginator->last('最後 >>') ?>
	</ul>
</div>
<?php endif; ?>

<?= $this->Html->link('タグ一覧へ戻る', ['action' => 'index'], ['class' => 'button']) ?>
</div>
indexは特に変わったことはしてないので省略します。
管理画面
管理画面でタグの登録や編集をできるようにしてみましょう。
この辺はbakeでサクッと作っていきます。
$ bin/cake bake controller tags --prefix admin
$ bin/cake bake template tags --prefix Admin
タグの方はこれでほぼほぼ動く状態だと思いますので、気になるところがあったら直してみてください。
すでに作成してある投稿(Post)の方だけ直してみましょう。
基本的には編集・作成画面でタグ一覧を表示してチェックできるようにします。
詳細画面では所属しているタグを表示しましょう。
src/Controller/Admin/PostsController.php
class PostsController extends AdminController
{
	public function initialize(): void
	{
		parent::initialize();
		$this->loadModel('Users');
		$this->loadModel('Tags');
	}

	public function index()
	{
		$this->paginate = [
			'contain' => ['Users'],
			'order' => [
				'Posts.id' => 'desc'
			]
		];
		$posts = $this->paginate($this->Posts);

		$this->set(compact('posts'));
	}

	public function view($id = null)
	{
		$post = $this->Posts->get($id, [
			'contain' => ['Users', 'Tags'],
		]);

		$this->set('post', $post);
	}

	public function add()
	{
		$post = $this->Posts->newEmptyEntity();
		if ($this->request->is('post')) {
			$post = $this->Posts->patchEntity($post, $this->request->getData());
			if ($this->Posts->save($post)) {
				$this->Flash->success(__('The post has been saved.'));

				return $this->redirect(['action' => 'index']);
			}
			$this->Flash->error(__('The post could not be saved. Please, try again.'));
		}

		// ユーザーリストを取得
		$users = $this->Users->find('list');
		$tags = $this->Tags->find('list');

		$this->set(compact('post', 'users', 'tags'));
	}

	public function edit($id = null)
	{
		$post = $this->Posts->get($id, [
			'contain' => ['Tags'],
		]);
		if ($this->request->is(['patch', 'post', 'put'])) {
			$post = $this->Posts->patchEntity($post, $this->request->getData());
			if ($this->Posts->save($post)) {
				$this->Flash->success(__('The post has been saved.'));

				return $this->redirect(['action' => 'index']);
			}
			$this->Flash->error(__('The post could not be saved. Please, try again.'));
		}

		// ユーザーリストを取得
		$users = $this->Users->find('list');
		$tags = $this->Tags->find('list');

		$this->set(compact('post', 'users', 'tags'));
	}

	public function delete($id = null)
	{
		$this->request->allowMethod(['post', 'delete']);
		$post = $this->Posts->get($id);
		if ($this->Posts->delete($post)) {
			$this->Flash->success(__('The post has been deleted.'));
		} else {
			$this->Flash->error(__('The post could not be deleted. Please, try again.'));
		}

		return $this->redirect(['action' => 'index']);
	}
}
addeditでタグをリストで取得してビューに渡します。
あとはcontainにTagsを追加しているところが変更点です。
ビュー
詳細画面は所属しているタグを一覧表示するだけなので、$post->tagsで展開します。
templates/Admin/Posts/view.php
<tr>
	<th><?= __('Tag') ?></th>
	<td>
	<?php if(!empty($post->tags)): ?>
	<?php foreach($post->tags as $tag): ?>
		<?= $this->Html->link($tag->title,
			['controller' => 'tags', 'action' => 'view', $tag->id]);
		?>
		<?= $tag !== end($post->tags) ? ',' : '' ?>
	<?php endforeach; ?>
	<?php endif; ?>
	</td>
</tr>
追加、編集画面ではチェックボックスでタグを選択できる部分を追加します。
templates/Admin/Posts/add.php&edit.php
echo $this->Form->control('tags._ids', [
	'multiple' => 'checkbox', 'options' => $tags
]);
デフォルトだとセレクトボックなのでちょっとだけオプションを追加します。
これだけで関連付けされている項目はチェックしてくれるのですごい便利ですね。
ということで以上になります。
今回は投稿機能ができあがっている状態で機能を追加したのでいろいろ編集しましたが、最初にデータベース作成してbakeさせればもっと簡単だったと思います。
完全版のソースは下記をご確認ください。
ここまでのソースコードはこちら