使用環境
Laravel 5.7
jwt-auth 1.0.0-rc3
vue: ^2.5.7
element-ui: ^2.4.8
vue-router: ^3.0.1
vuex: ^3.0.1
この記事は下記の続きです。
Laravel + JWTAuth + Vue.js でAPIログイン認証の実装
Laravel + Vue.js にVuexを導入する
LaravelでCRUD APIを作成する
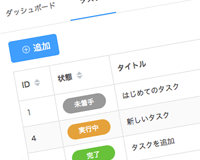
完成イメージはこんな感じです。
ストアの作成
ストアから作成していきます。
最初にメインのタスクストアから。
resources/js/store/modules/task.js
const state = {
	tasks: []
};

const mutations = {
	setData(state, tasks) {
		state.tasks = tasks
	},
	update(state, {task, newTask}) {
		Object.assign(task, newTask);
	},
	delete(state, index) {
		state.tasks.splice(index, 1);
	},
	add(state, task) {
		state.tasks.push(task);
	}
};

const getters = {
	getTasks (state) {
		return state.tasks;
	}
};

const actions = {
	async fetch ({ commit }) {
		await axios.get('/api/tasks').then(res => {
			commit('setData', res.data);
		});
	},
	async delete ({state, commit}, task) {
		const index = state.tasks.indexOf(task);

		return await axios.delete('/api/tasks/' + task.id)
			.then(res => {
				commit('delete', index);
				return true;
			}).catch(error => {
				return error;
			});
	},
	async store ({state, commit}, task) {
		return await axios.post('/api/tasks/', task)
			.then(res => {
				commit('add', res.data);
				return true;
			}).catch(error => {
				return error;
			});
	},
	async update ({state, commit}, newTask) {
		// stateからマッチしたtaskを取り出す
		const task = state.tasks.find((o) => {
			return o.id === newTask.id;
		});

		if (!task) {
			return false;
		}

		return await axios.patch('/api/tasks/' + newTask.id, newTask)
			.then(res => {
				commit('update', {task, newTask});
				return true;
			}).catch(error => {
				return error;
			});
	}
};

export default {
	namespaced: true,
	state,
	mutations,
	getters,
	actions
};
Laravelで作成したAPIと同じように「store(作成)」「update(更新)」「delete(削除)」と全てのデータをロードする「fetch」を作成します。
次はユーザーストア。LaravelでAPI作ってないのでひとまず仮です。
resources/js/store/modules/user.js
const state = {
	users: [
		{ id: 1, name: '山田 太郎' },
		{ id: 2, name: '田中 一郎' }
	]
};

const getters = {
	getUsers: (state) => {
		return state.users;
	},
	// idで検索
	getUserById: (state) => (id) => {
		const user = state.users.find((user) => {
			return user.id === id
		});
		if (user) {
			return user.name;
		} else {
			return "";
		}
	}
};

export default {
	namespaced: true,
	state,
	getters
};
作成したモジュールを登録してストアは完成。
resources/js/store/index.js
import Vue from 'vue';
import Vuex from 'vuex';

import auth from "./modules/auth";
import task from "./modules/task";
import user from "./modules/user";

Vue.use(Vuex);

export default new Vuex.Store({
    modules: {
        auth, task, user
    },
    strict: true
});
ElementUIのインストール
コンポーネントを作成する前に、今回はコンポーネントライブラリにElementUIを使用するので、npmでインストールしておきます。
$ npm i element-ui -S
app.js を編集してElementUIを日本語で使用できるようにします。
resources/js/app.js
require('./bootstrap');

import Vue from 'vue';
import router from './router';
import store from './store/index';
import ElementUI from 'element-ui';
import lang from 'element-ui/lib/locale/lang/ja';
import locale from 'element-ui/lib/locale';

locale.use(lang);
Vue.use(ElementUI, { locale });

Vue.component('app', require('./components/App.vue'));

const app = new Vue({
	store,
	router
}).$mount('#app');
コンポーネントの作成
メインとなるタスクコンポーネントを作成していきます。
テンプレート部分。
resources/js/components/pages/Task.vue
<template>
	<div>
		<el-row justify="space-between">
			<el-col :span="22">
			</el-col>
			<el-col :span="2">
				<el-button type="primary" size="medium" icon="el-icon-circle-plus-outline" @click="handleAddModal()" style="width: 100%;">追加</el-button>
			</el-col>
		</el-row>
		<el-table :data="getTasks" :row-key="row => row.id" border stripe size="small">
			<el-table-column prop="id" label="ID" width="60" sortable></el-table-column>
			<el-table-column label="状態" prop="state_id" width="100" sortable>
				<template slot-scope="scope">
					<span class="tag" :style="{ background: status[scope.row.state_id].color }">
						{{ status[scope.row.state_id].name }}
					</span>
				</template>
			</el-table-column>
			<el-table-column prop="title" label="タイトル" width="320"></el-table-column>
			<el-table-column prop="due_at" label="期日" width="180" sortable></el-table-column>
			<el-table-column prop="user_id" :formatter="userFormatter" label="担当" width="100" sortable></el-table-column>
			<el-table-column label="アクション" fixed="right">
				<template slot-scope="scope">
					<el-button size="mini" type="primary" @click="handleEditModal(scope.row)" icon="el-icon-edit-outline">編集</el-button>
					<el-button size="mini" type="danger" @click="handleDaleteModal(scope.row)" icon="el-icon-delete">削除</el-button>
				</template>
			</el-table-column>
		</el-table>

		<el-dialog title="タスクの編集" :visible.sync="isInputModal">
			<el-form ref="form" :model="newTask" label-width="120px">
				<el-form-item label="タイトル">
					<el-input v-model="newTask.title" autocomplete="off"></el-input>
				</el-form-item>
				<el-form-item label="状態">
					<el-select v-model="newTask.state_id">
						<el-option
							v-for="(item, index) in status"
							:key="index"
							:label="item.name"
							:value="index">
						</el-option>
					</el-select>
				</el-form-item>
				<el-form-item label="期日">
					<el-date-picker
							v-model="newTask.due_at"
							type="datetime"
							value-format="yyyy-MM-dd HH:mm:ss">
					</el-date-picker>
				</el-form-item>
				<el-form-item label="担当">
					<el-select v-model="newTask.user_id" clearable>
						<el-option
							v-for="item in getUsers"
							:key="item.index"
							:label="item.name"
							:value="item.id">
						</el-option>
					</el-select>
				</el-form-item>
			</el-form>
			<span slot="footer" class="dialog-footer">
				<el-button @click="isInputModal = false">キャンセル</el-button>
				<el-button type="primary" @click="handleSave(newTask)">保存</el-button>
			</span>
		</el-dialog>

		<el-dialog
			title="削除確認"
			:visible.sync="isDeleteModal"
			width="30%">
			<span>タスクID:{{ deleteTask.id }}を削除しますか?</span>
			<span slot="footer" class="dialog-footer">
				<el-button @click="isDeleteModal = false">キャンセル</el-button>
				<el-button type="primary" @click="handleDalete(deleteTask)">削除</el-button>
			</span>
		</el-dialog>
	</div>
</template>
ElementUIのテーブルはel-tableを使用します。
:row-keyにインデックスなどユニークなキーを指定しないと更新がうまくいかないようです。
<el-table :data="getTasks" :row-key="row => row.id" border stripe size="small">
テーブルのカラムの部分はel-table-columnで設定します。
カラムの中をボタンや単純な文字以外の表示をしたい場合はtemplate slot-scopeでカスタマイズをすることができます。
今回はstate_idの部分をタグのように色分けしたかったのでカスタマイズしています。
<el-table-column label="状態" prop="state_id" width="100" sortable>
	<template slot-scope="scope">
		<span class="tag" :style="{ background: status[scope.row.state_id].color }">
			{{ status[scope.row.state_id].name }}
		</span>
	</template>
</el-table-column>
次にスクリプト部分です。
<script>
import { mapGetters, mapActions } from 'vuex'

export default {
	data() {
		return {
			isInputModal: false,
			isDeleteModal: false,
			newTask: {},
			deleteTask: {},
			status: [{
				name: '未着手',
				color: '#999'
			},{
				name: '実行中',
				color: '#E6A23C'
			}, {
				name: '完了',
				color: '#67C23A'
			}],
		}
	},
	computed: {
		...mapGetters('user', [
			'getUsers', 'getUserById'
		]),
		...mapGetters('task', [
			'getTasks'
		]),
	},

	mounted() {
		this.fetch();
	},
	methods: {
		...mapActions('task', [
			'fetch', 'store', 'update', 'delete'
		]),
		// 保存
		handleSave(task) {
			// idがあったらupdateなければstore
			if (task.id) {
				this.update(task).then(res => {
					if(res === true) {
						this.$notify({
							title: '成功',
							message: 'タスクを更新しました。',
							type: 'success'
						});
					} else {
						this.$notify({
							title: 'エラー',
							message: 'タスクの更新に失敗しました。',
							type: 'error'
						});
					}
				});
			} else {
				this.store(task).then(res => {
					if(res === true) {
						this.$notify({
							title: '成功',
							message: 'タスクを追加しました。',
							type: 'success'
						});
					} else {
						this.$notify({
							title: 'エラー',
							message: 'タスクの追加に失敗しました。',
							type: 'error'
						});
					}
				});
			}
			this.isInputModal = false;
		},
		// 新規作成モーダル
		handleAddModal() {
			this.newTask = {};
			this.isInputModal = true;
		},
		// 編集モーダル
		handleEditModal(task) {
			this.newTask = Object.assign({}, task);
			this.isInputModal = true;
		},
		// 削除
		handleDaleteModal(task) {
			this.deleteTask = task;
			this.isDeleteModal = true;
		},
		handleDalete(task) {
			this.delete(task).then(res => {
				if(res === true) {
					this.$notify({
						title: '成功',
						message: 'タスクを削除しました。',
						type: 'success'
					});
				} else {
					this.$notify({
						title: 'エラー',
						message: 'タスクの削除に失敗しました。',
						type: 'error'
					});
				}
			});
			this.isDeleteModal = false;
		},
		statusFormatter(row, column) {
			return this.status[row.state_id];
		},
		userFormatter (row, column) {
			return this.getUserById(row.user_id);
		}
	}
}
</script>
ルーターに登録
最後に作成したコンポーネントをルーターに登録します。
resources/js/router.js
import Vue from 'vue';
import VueRouter from 'vue-router';
import store from './store/index';

import Dashboard from './components/pages/Dashboard';
import Login from './components/pages/Login';
import User from './components/pages/User';
import Task from './components/pages/Task';

Vue.use(VueRouter);

const routes = [
	{ path: '/', component: Dashboard },
	{ path: '/tasks', component: Task },
	{ path: '/user', component: User },
	{ path: '/login', component: Login, meta: { allowAuth: true } }
];

const router = new VueRouter({
	mode: 'history',
	routes
});

router.beforeEach((to, from, next) => {
	// allowAuth はログイン不要
	if (to.matched.some(record => record.meta.allowAuth)) {
		next();
	} else {
		if (store.getters['auth/isLogin'] === false) {
			next({
				path: '/login',
				query: { redirect: to.fullPath }
			});
		} else {
			next();
		}
	}
});

export default router;
ほとんどのページがログイン必須なら、必要ないページにmetaを追加した方がいいですよね。
以上です。
次回はVueでの絞り込み検索とかする予定です。